To install a Kubernetes Cluster on AWS EKS using eksctl, you can follow these steps. This guide is structured similarly to the one from ComputingForGeeks, ensuring all necessary steps are covered.
Prerequisites Link to heading
- AWS Account: Ensure you have an AWS account with sufficient permissions.
- AWS CLI: Install and configure the AWS CLI with appropriate IAM permissions.
- eksctl: Install
eksctl.
Install AWS CLI Link to heading
curl "https://awscli.amazonaws.com/awscli-exe-linux-x86_64.zip" -o "awscliv2.zip"
unzip awscliv2.zip
sudo ./aws/install
Configure AWS CLI with your credentials: Link to heading
aws configure
Install eksctl Link to heading
curl --silent --location "https://github.com/weaveworks/eksctl/releases/latest/download/eksctl_$(uname -s)_amd64.tar.gz" | tar xz -C /tmp
sudo mv /tmp/eksctl /usr/local/bin
Step 1: Create EKS Cluster Configuration File Link to heading
I choose eu-central-1 (frankfurt), you can choose your region
eks-sigma is my cluster name, you can define what you want
eksctl create cluster --name=eks-sigma \
--version 1.28 \
--region=eu-central-1 \
--zones=eu-central-1a,eu-central-1b,eu-central-1c \
--without-nodegroup
Step 2: Create Node Group Configuration Link to heading
You can create either a public or private node group depending on your requirements.
Public Node Group Configuration A public node group allows nodes to have public IP addresses and be directly accessible from the internet.
eksctl create nodegroup --cluster=eks-sigma \
--region=eu-central-1 \
--name=eks-sigma-nodegroup-public \
--node-type=t3.large \
--nodes=3 \
--nodes-min=1 \
--nodes-max=4 \
--node-volume-size=30 \
--ssh-access \
--ssh-public-key=kube-sigma \
--managed \
--asg-access \
--external-dns-access \
--full-ecr-access \
--appmesh-access \
--alb-ingress-access
Private Node Group Configuration A private node group keeps the nodes private within your VPC, without public IP addresses, enhancing security.
eksctl create nodegroup --cluster=eks-sigma \
--region=eu-central-1 \
--name=eks-sigma-nodegroup-private \
--node-type=t3.medium \
--nodes=3 \
--nodes-min=1 \
--nodes-max=4 \
--node-volume-size=30 \
--managed \
--node-private-networking \
--ssh-access \
--ssh-public-key=kube-sigma \
--asg-access \
--external-dns-access \
--full-ecr-access \
--appmesh-access \
--alb-ingress-access
Step 3: Configure kubectl Link to heading
kubectl is the command-line tool for interacting with the Kubernetes cluster. After the EKS cluster is up and running, you need to configure kubectl to communicate with your EKS cluster.
- Install kubectl:
curl -LO "https://dl.k8s.io/release/$(curl -L -s https://dl.k8s.io/release/stable.txt)/bin/linux/amd64/kubectl" chmod +x kubectl sudo mv kubectl /usr/local/bin/ - Enable kubectl to use your new EKS cluster:
aws eks --region eu-central-1 update-kubeconfig --name eks-sigma
Step 4: Verify the Cluster and Node Group Link to heading
To verify that your cluster and node group are set up correctly, you can run the following commands:
kubectl get svc
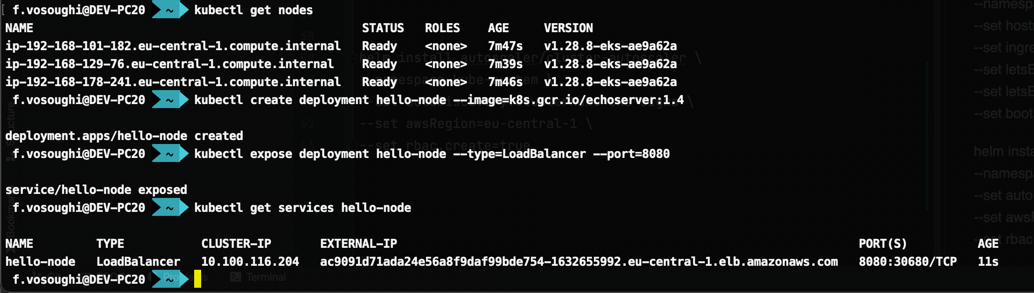
kubectl get nodes
Step 5: Deploy a Sample Application Link to heading
Now that your cluster is up and running, you can deploy a sample application to ensure everything is working correctly.
- Create a deployment:
kubectl create deployment hello-node --image=k8s.gcr.io/echoserver:1.4 - Expose the deployment as a service:
kubectl expose deployment hello-node --type=LoadBalancer --port=8080 - Get the service URL:
kubectl get services hello-node
After deploy sample application and expose it’s service, You can check external url with expose port in your browser :
http://ac9091d71ada24e56a8f9daf99bde754-1632655992.eu-central-1.elb.amazonaws.com:8080/