I have written about MongoDB clusters twice on this blog — once about the replica set I put into production in 2024, and once about sharding it a few months later. Both posts still get read, and readers of one keep ending up stuck on something the other one covers. So this is the version I should have written the first time: one guide, start to finish, that I can hand to a colleague and say “do this”.
It is long. It is meant to be. Skip to the part you need — the headings are honest — but if you are building your first cluster, read it in order, because every part depends on the one before it.
What you will have at the end:
- a three-node replica set on three servers that keeps serving when one of them dies,
- the same setup grown into a sharded cluster with two routers, three config servers and three shards,
- and the unglamorous part nobody blogs about: backups you have actually restored, upgrades that did not take you down, and a failover you triggered yourself before production triggered it for you.
Everything runs in Docker on plain Ubuntu boxes at Hetzner. Nothing here needs Kubernetes, an operator, or a managed service. Those are fine choices; this guide is for when you have decided against them.
Which cluster do you actually need? Link to heading
The most expensive mistake in this whole area is sharding too early, and the second most expensive is sharding too late. Here is the rule I use now.
You need a replica set if you need the database to stay up. That is it. A replica set is three copies of the same data on three machines, one of which accepts writes. When that one fails, the other two elect a replacement in about ten seconds, and your application’s driver reconnects without you doing anything. It also gives you a place to run backups and heavy reads that is not your primary. Almost everyone needs this, and most people who think they need sharding actually need this.
You need a sharded cluster if a single machine can no longer hold your data or absorb your writes. Not “might not in two years” — cannot, or will not within your next hardware upgrade. Sharding splits a collection across several replica sets so that each one holds and writes a fraction of it. It roughly multiplies your write capacity and your storage by the number of shards. The price is real: eleven or more processes instead of three, a routing layer, a metadata layer, and one design decision — the shard key — that is very hard to undo.
I ran on a replica set for a couple of months before the write volume of one collection made the decision for me. When I did shard, the replica set I already had became shard one. Nothing was wasted, which is the point of doing it in this order.
The ground every node stands on Link to heading
Whatever you build, every server gets the same preparation. Do this once, script it, and run the script on every new box. Half the “MongoDB is slow” threads I have read were host problems.
Hardware Link to heading
Three identical dedicated servers. Identical matters more than big: a replica set with one weak member has a weak member as primary one day, and you will not enjoy that day. I use Hetzner dedicated machines with NVMe drives; the network between them is good and the price-to-performance is hard to argue with. Put the data directory on its own disk or partition, formatted XFS — that is what MongoDB tests against and what WiredTiger behaves best on.
Host settings Link to heading
These are the ones that actually matter. I keep them in a script; the values below are the script.
# Transparent huge pages hurt WiredTiger. Turn them off, and make it stick across reboots.
echo never > /sys/kernel/mm/transparent_hugepage/enabled
echo never > /sys/kernel/mm/transparent_hugepage/defrag

# Do not swap a database. 1 rather than 0 so the kernel still can in a true emergency.
sysctl -w vm.swappiness=1

# Big connection counts need big backlogs.
sysctl -w net.core.somaxconn=65535
sysctl -w net.ipv4.tcp_max_syn_backlog=65535

# Keepalives shorter than the default two hours, so dead peers are noticed.
sysctl -w net.ipv4.tcp_keepalive_time=300
sysctl -w net.ipv4.tcp_keepalive_intvl=30
sysctl -w net.ipv4.tcp_keepalive_probes=5

# Time. Elections and oplog ordering assume the clocks agree.
timedatectl set-ntp true
Put the sysctls in /etc/sysctl.d/90-mongodb.conf so they survive a reboot. The huge-pages setting needs a small systemd unit or an rc.local line; MongoDB’s own docs have one, and it works.
Docker, and the user MongoDB runs as Link to heading
Install Docker from Docker’s repository, not Ubuntu’s. Then the single most useful fact in this guide: the mongo image runs mongod as uid 999. Every file you mount into the container — the data directory, the keyfile, the config — must be readable by 999, and the keyfile must be readable only by 999. Get this wrong and the container exits within a second with a permissions error you will not read carefully the first three times.
The keyfile Link to heading
Members of a cluster authenticate to each other with a shared secret file. Generate it once, on one machine, and copy that same file everywhere. Do not generate one per server; they will not match, and the nodes will refuse each other.
mkdir -p /mongodb && cd /mongodb
openssl rand -base64 756 > mongo-keyfile
chmod 400 mongo-keyfile
chown 999:999 mongo-keyfile
Then scp that file to every other node into the same path with the same permissions. Treat it like a private key, because that is what it is.
DNS Link to heading
Decide your hostnames now. I give every node an A record — mongo1, mongo2, mongo3 under a domain I control — and I do this before initiating anything, because the hostnames you initiate the replica set with are the hostnames it will use forever. Changing them later is a reconfiguration, not a rename. If your DNS is at Cloudflare, these records must be DNS only (the grey cloud). Proxied records point at Cloudflare’s edge, which does not speak the MongoDB wire protocol, and the failure looks like a timeout rather than an obvious error.
Part 1 — A replica set that survives a dead server Link to heading
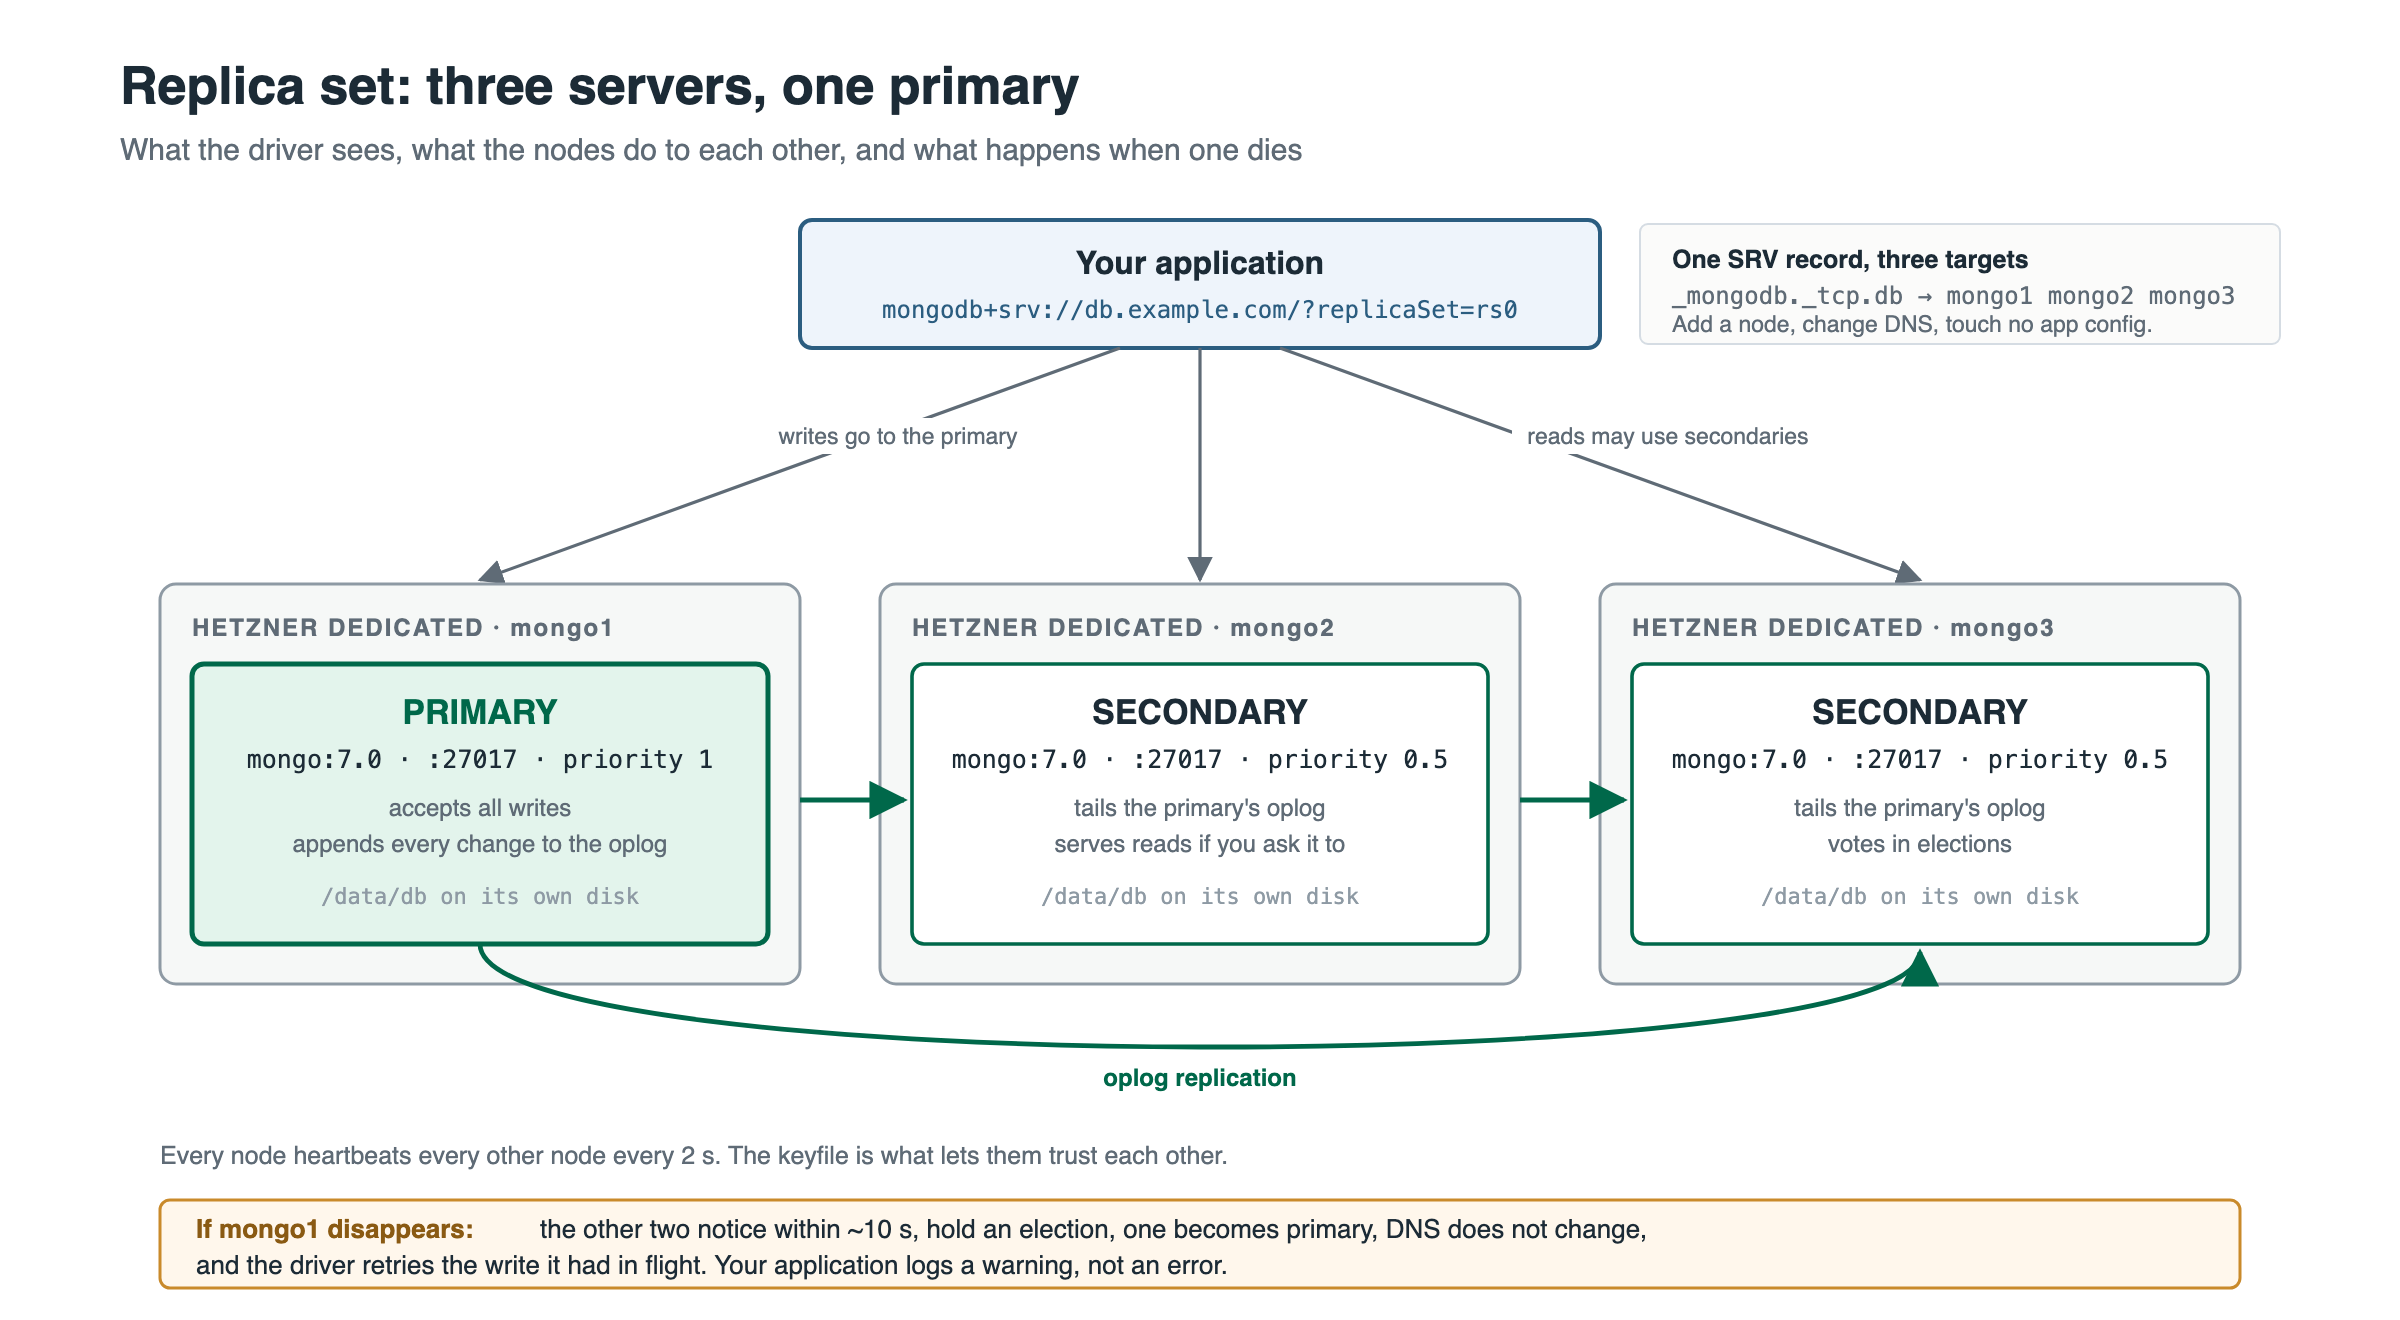
Three servers, one mongod each, one replica set called rs0. Same compose file on all three; the only thing that differs per host is the hostname, and that lives in DNS.
The compose file Link to heading
services:
  mongo:
    image: mongo:7.0
    container_name: mongo
    command: ["mongod", "--config", "/etc/mongod.conf"]
    ports:
      - "27017:27017"
    volumes:
      - /mongodb/data:/data/db
      - /mongodb/mongod.conf:/etc/mongod.conf:ro
      - /mongodb/mongo-keyfile:/data/configdb/mongo-keyfile:ro
      - /mongodb/log:/var/log/mongodb
    user: "999:999"
    ulimits:
      nofile:
        soft: 1048576
        hard: 1048576
      nproc:
        soft: 1048576
        hard: 1048576
      memlock:
        soft: -1
        hard: -1
    deploy:
      resources:
        limits:
          memory: 110G
    restart: always
    networks:
      - mongodb

networks:
  mongodb:
    driver: bridge
Two things people ask about. The memory limit is there so that a runaway process gets killed by Docker rather than taking the host down with it; set it to about 90 percent of the box. And I bind-mount host directories rather than using named volumes because I want to be able to ls the data directory, snapshot the disk, and know exactly where the bytes are. Named volumes are fine; I just prefer knowing.
The mongod.conf Link to heading
net:
  port: 27017
  bindIp: 0.0.0.0
  maxIncomingConnections: 300000

security:
  authorization: enabled
  keyFile: /data/configdb/mongo-keyfile

replication:
  replSetName: rs0
  oplogSizeMB: 16384

storage:
  dbPath: /data/db
  wiredTiger:
    engineConfig:
      cacheSizeGB: 100
      journalCompressor: zstd
    collectionConfig:
      blockCompressor: zstd

systemLog:
  destination: file
  path: /var/log/mongodb/mongod.log
  logAppend: true
  logRotate: reopen

setParameter:
  transactionLifetimeLimitSeconds: 60
The cache size is the number everyone copies without thinking, so think about it. WiredTiger’s default is half of your RAM minus a gigabyte, and that default is a good one when anything else runs on the machine, because WiredTiger also benefits from the operating system’s file cache holding compressed blocks. I run 100 GB on a 128 GB box because nothing else runs there and I measured it. If you are not going to measure it, leave the line out.
The oplog is the replication log, and its size is how long a secondary can be offline and still catch up without a full resync. 16 GB gives me many hours of headroom on my write volume; check yours later with rs.printReplicationInfo(), which tells you the window in hours. Bigger than you need is cheap. Smaller than you need is a resync at 3 a.m.
bindIp: 0.0.0.0 is correct here only because the host firewall allows 27017 from the other cluster members and from the application servers and from nowhere else. A MongoDB port open to the internet is how databases end up in ransom notes. Put the firewall rule in before you start the container, not after.
Bring them up and connect them Link to heading
On all three hosts:
docker compose up -d
docker logs -f mongo     # wait for "Waiting for connections"
Then on one of them — it does not matter which — open a shell and initiate the set using the DNS names:
docker exec -it mongo mongosh
rs.initiate({
  _id: "rs0",
  members: [
    { _id: 0, host: "mongo1.example.com:27017", priority: 2 },
    { _id: 1, host: "mongo2.example.com:27017", priority: 1 },
    { _id: 2, host: "mongo3.example.com:27017", priority: 1 }
  ]
})
The priorities are a preference, not a rule: mongo1 will be primary whenever it is healthy, and either of the others will take over when it is not. I like knowing which box is primary on a normal day; it makes the graphs easier to read.
Wait a few seconds and then create your admin user. There is a chicken-and-egg problem here — authorization is on, but there are no users — and MongoDB solves it with the localhost exception: the first user may be created from a connection on the same host, with no credentials, as long as no user exists yet. That is why you do this from inside the container.
use admin
db.createUser({
  user: "root",
  pwd: passwordPrompt(),
  roles: [ { role: "root", db: "admin" } ]
})
passwordPrompt() keeps the password out of your shell history. It is a small thing that I wish I had known earlier.
Check it Link to heading
rs.status().members.map(m => ({ name: m.name, state: m.stateStr, health: m.health }))
[
  { name: 'mongo1.example.com:27017', state: 'PRIMARY',   health: 1 },
  { name: 'mongo2.example.com:27017', state: 'SECONDARY', health: 1 },
  { name: 'mongo3.example.com:27017', state: 'SECONDARY', health: 1 }
]
If a member shows STARTUP2 it is doing an initial sync and will get there. If it shows (not reachable/healthy) the problem is almost always one of: firewall, the keyfile differs, or the hostname in the config does not resolve from the other nodes — test DNS from a cluster member, not from your laptop.
One SRV record, so nobody hard-codes hostnames Link to heading
Your application should not carry a list of three hostnames in its config. It should carry one name, and DNS should answer with the list. That is what an SRV record is for:
_mongodb._tcp.db.example.com.  SRV  0 5 27017 mongo1.example.com.
_mongodb._tcp.db.example.com.  SRV  0 5 27017 mongo2.example.com.
_mongodb._tcp.db.example.com.  SRV  0 5 27017 mongo3.example.com.
Then the connection string every application uses is:
mongodb+srv://root:<password>@db.example.com/appdb?replicaSet=rs0&authSource=admin&readPreference=secondaryPreferred&retryWrites=true&w=majority
Three parameters there are choices, so let me defend them. readPreference=secondaryPreferred sends reads to the secondaries and keeps the primary for writes; if your application cannot tolerate reading a few milliseconds behind, drop it and read from the primary. w=majority means a write is acknowledged only when two of the three nodes have it, which is the difference between “durable” and “durable unless the primary dies in the next second”. retryWrites=true is the default in modern drivers and is what makes a failover invisible to your code.
Verify the SRV record from a server, not your laptop: dig SRV _mongodb._tcp.db.example.com should list all three targets.
Now break it on purpose Link to heading
This is the step everyone skips and the only one that proves anything. On the primary’s host:
docker stop mongo
Watch rs.status() from another node. Within about ten seconds one of the secondaries becomes PRIMARY. Your application, if it is using the connection string above, logged a warning and carried on. Bring the old primary back with docker compose up -d and watch it rejoin as a secondary, catch up from the oplog, and — because of the priorities — take the primary role back a minute or so later.
Time it. Write the number down. When it happens for real, you will want to know what normal looks like.
Part 2 — Growing into a sharded cluster Link to heading
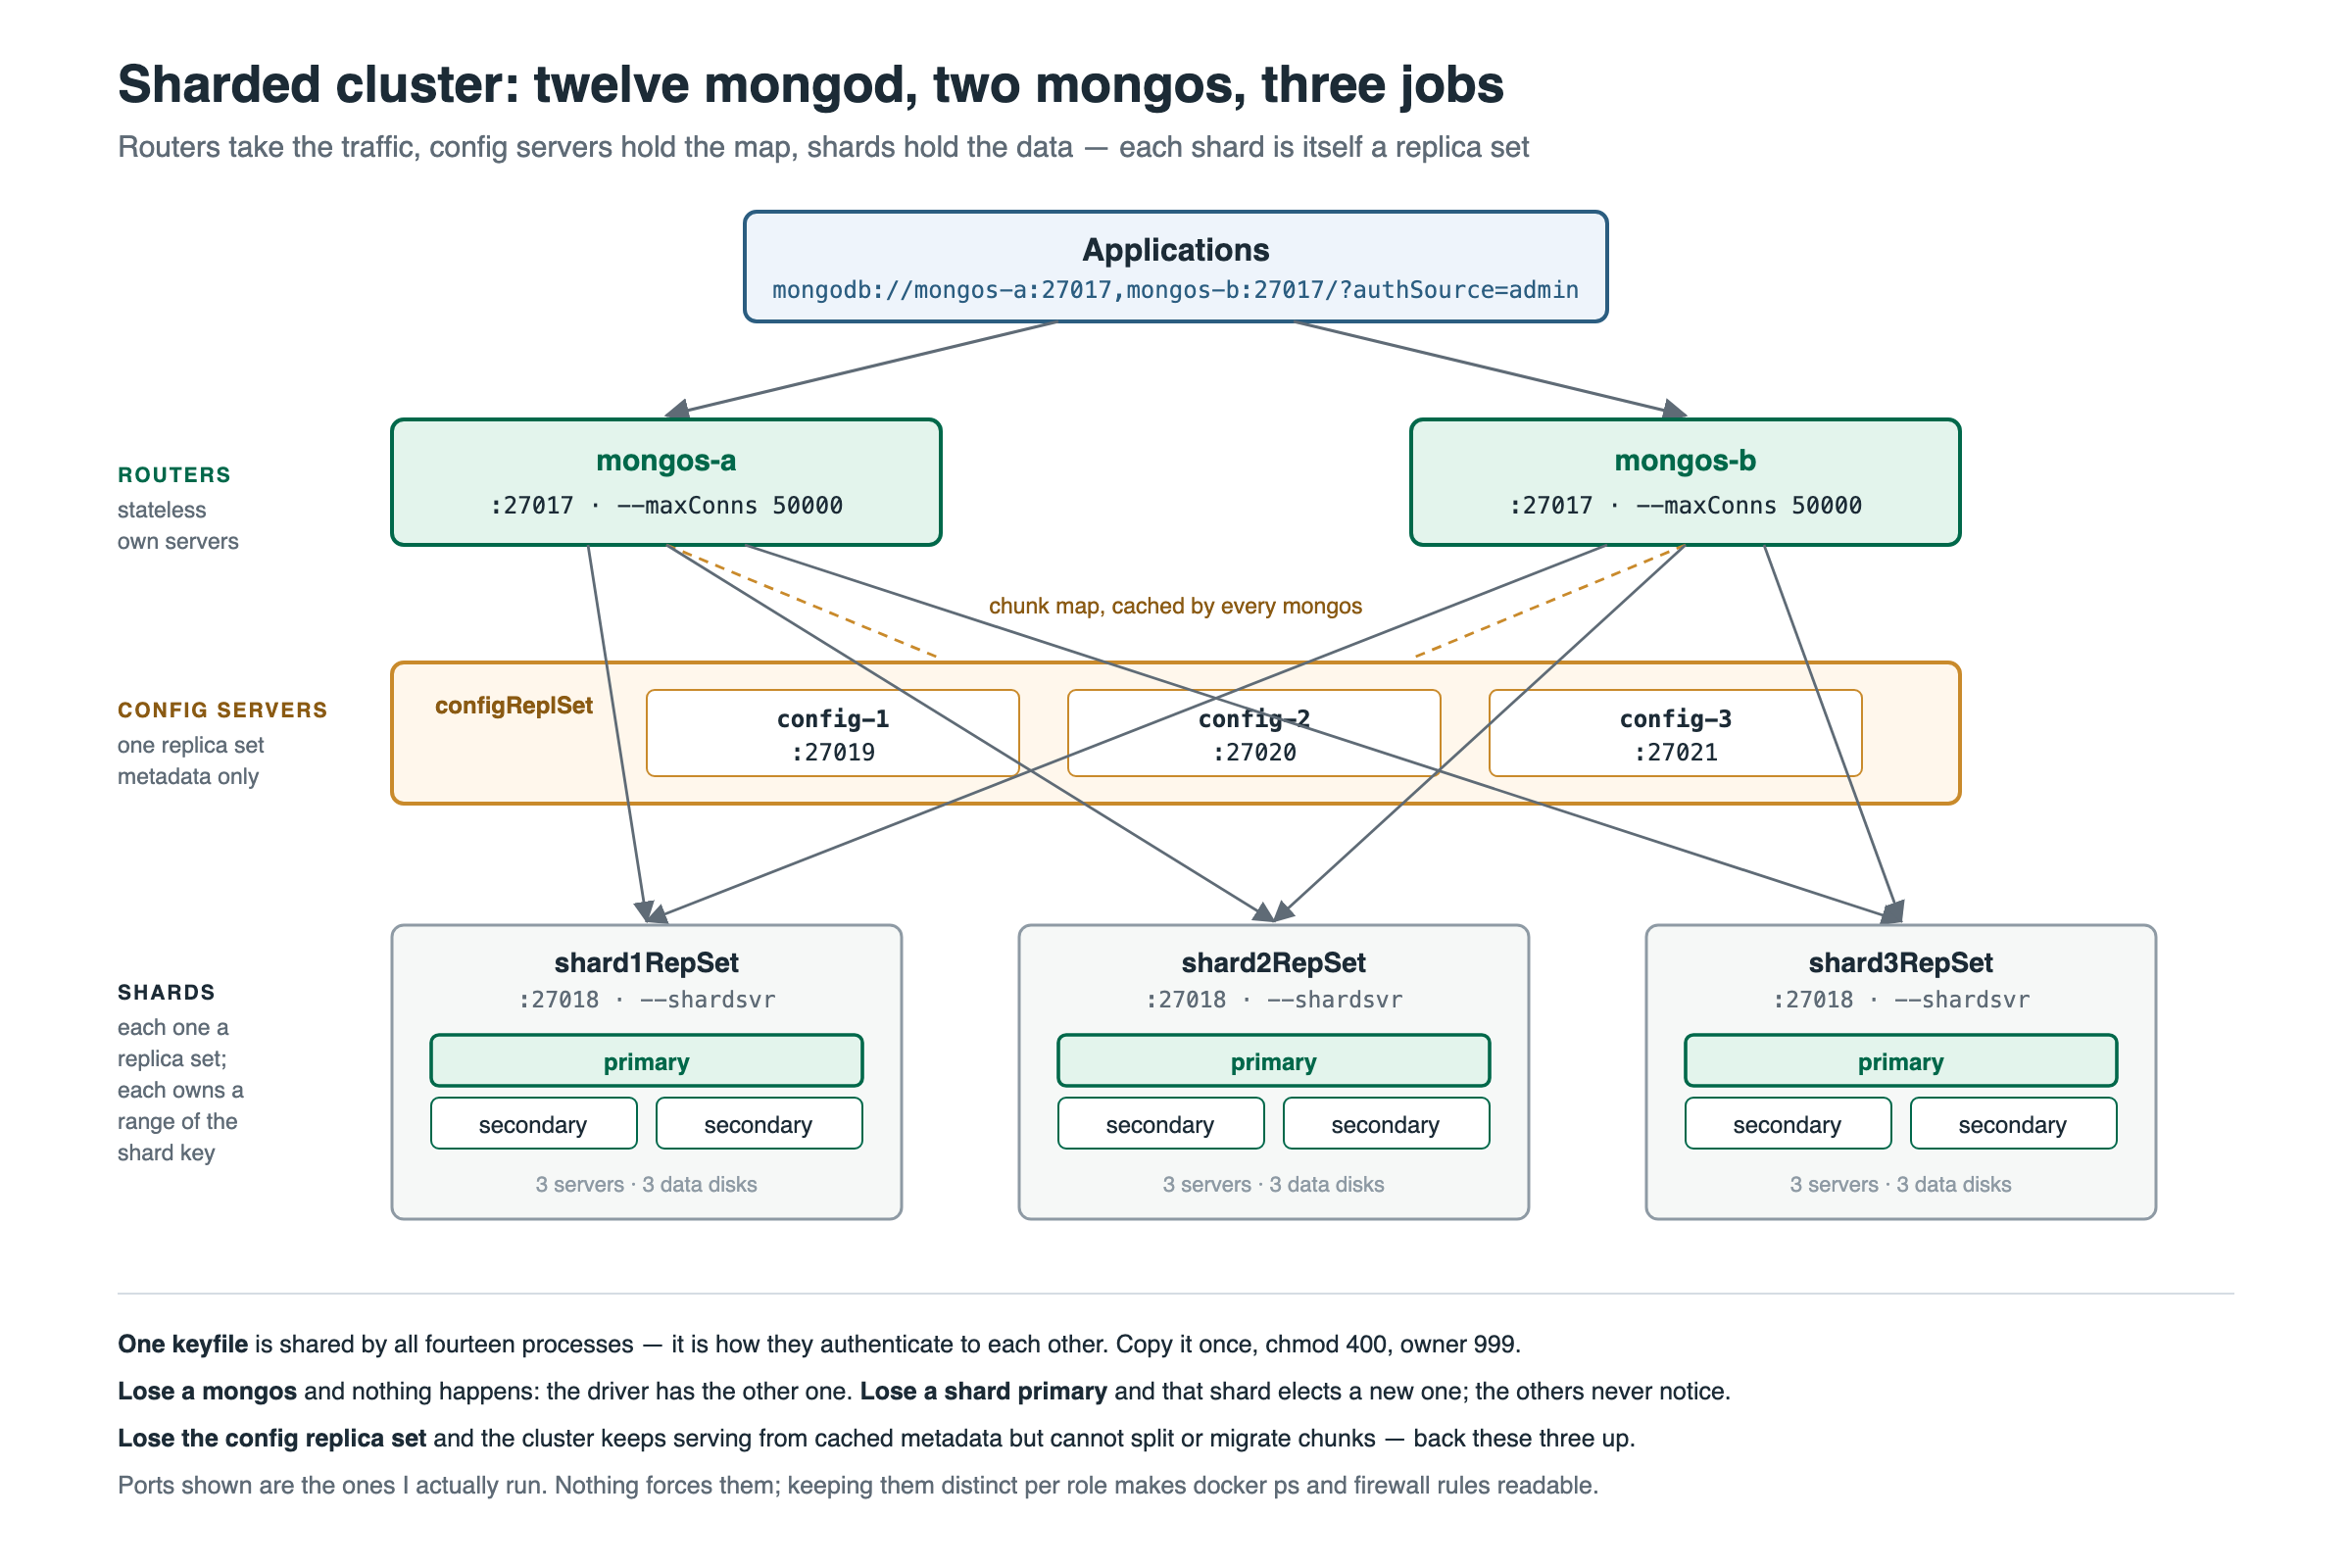
A sharded cluster adds two roles to the one you already know:
- Config servers hold the map of which shard owns which range of the data. They are a replica set of their own, they hold very little data, and the cluster cannot rebalance without them.
- mongos routers are what applications now connect to instead of the data nodes. They are stateless: they cache the map from the config servers and forward each operation to the shard that owns it.
- Shards are the data nodes — and each shard is a replica set exactly like the one you built in Part 1.
Fourteen processes for the setup I run: three config servers, two routers, and three shards of three. It sounds like a lot. It is not that much more work than the replica set once you notice that it is the same compose file three more times with different flags.
Config servers Link to heading
I run the three config servers on the three shard hosts, one each, alongside the shard containers. They are tiny, and it saves three machines. They get their own ports so that docker ps and the firewall rules stay readable.
services:
  config-1:
    image: mongo:7.0
    container_name: config-1
    command: >
      mongod --configsvr --replSet configReplSet
      --port 27019 --bind_ip 0.0.0.0
      --dbpath /data/db
      --wiredTigerCacheSizeGB 4
      --auth --keyFile /data/mongo-keyfile
    ports:
      - "27019:27019"
    volumes:
      - /mongodb/config-1:/data/db
      - /mongodb/mongo-keyfile:/data/mongo-keyfile:ro
    user: "999:999"
    ulimits:
      nofile: { soft: 100000, hard: 100000 }
    restart: always
Repeat on the other two hosts as config-2 on 27020 and config-3 on 27021, then initiate from any one of them:
rs.initiate({
  _id: "configReplSet",
  configsvr: true,
  members: [
    { _id: 0, host: "mongo1.example.com:27019" },
    { _id: 1, host: "mongo2.example.com:27020" },
    { _id: 2, host: "mongo3.example.com:27021" }
  ]
})
Shards Link to heading
Each shard is the Part 1 replica set with one extra flag, --shardsvr, and a name per shard. If you already have a replica set in production, that set becomes shard1RepSet by adding the flag and restarting the members one at a time; nothing about the data changes.
services:
  shard1:
    image: mongo:7.0
    container_name: shard1
    command: >
      mongod --shardsvr --replSet shard1RepSet
      --port 27018 --bind_ip 0.0.0.0
      --dbpath /data/db
      --wiredTigerCacheSizeGB 32
      --oplogSize 16384
      --auth --keyFile /data/mongo-keyfile
    ports:
      - "27018:27018"
    volumes:
      - /mongodb/shard1:/data/db
      - /mongodb/mongo-keyfile:/data/mongo-keyfile:ro
    user: "999:999"
    ulimits:
      nofile: { soft: 100000, hard: 100000 }
    deploy:
      resources:
        limits: { memory: 96G }
    restart: always
Three hosts per shard, rs.initiate per shard exactly as in Part 1. Yes, that is nine data servers for three shards. You can start with each shard as a single-member replica set on one host and add members later — it works, and it is how I tested — but a shard with one member is a shard that goes down when one machine does, which defeats the purpose of everything above.
Routers Link to heading
The routers go on their own small machines, or alongside your application servers. Never on a shard host: when a shard box dies you want the routers to be the thing that is still up.
services:
  mongos:
    image: mongo:7.0
    container_name: mongos
    command: >
      mongos
      --configdb configReplSet/mongo1.example.com:27019,mongo2.example.com:27020,mongo3.example.com:27021
      --port 27017 --bind_ip 0.0.0.0
      --keyFile /data/mongo-keyfile
      --maxConns 50000
    ports:
      - "27017:27017"
    volumes:
      - /mongodb/mongo-keyfile:/data/mongo-keyfile:ro
    user: "999:999"
    ulimits:
      nofile: { soft: 100000, hard: 100000 }
    restart: always
Two of these, mongos-a and mongos-b, on two hosts. Note there is no data volume: a router has no data.
Wire it together Link to heading
Connect to a router. The localhost exception applies here too, so create the admin user first, from inside the mongos container, exactly as before. Then:
sh.addShard("shard1RepSet/mongo1.example.com:27018")
sh.addShard("shard2RepSet/mongo4.example.com:27018")
sh.addShard("shard3RepSet/mongo7.example.com:27018")

sh.enableSharding("appdb")
sh.shardCollection("appdb.events", { userId: "hashed" })
You only have to name one member of each replica set; the router discovers the rest. Then:
sh.status()
shards
[
  { _id: 'shard1RepSet', host: 'shard1RepSet/mongo1.example.com:27018,...', state: 1 },
  { _id: 'shard2RepSet', host: 'shard2RepSet/mongo4.example.com:27018,...', state: 1 },
  { _id: 'shard3RepSet', host: 'shard3RepSet/mongo7.example.com:27018,...', state: 1 }
]
active mongoses
[ { '7.0.14': 2 } ]
balancer
{ 'Currently enabled': 'yes', 'Currently running': 'no' }
databases
[
  {
    database: { _id: 'appdb', primary: 'shard2RepSet', partitioned: true },
    collections: {
      'appdb.events': {
        shardKey: { userId: 'hashed' },
        chunkMetadata: [
          { shard: 'shard1RepSet', nChunks: 2 },
          { shard: 'shard2RepSet', nChunks: 2 },
          { shard: 'shard3RepSet', nChunks: 2 }
        ]
      }
    }
  }
]
Here is a gotcha that cost me an evening: sh.addShard can fail quietly on a transient network problem — the command returns, the shard is not in the list. Always read sh.status() after adding shards. Do not trust the return value.
The shard key is the whole game Link to heading
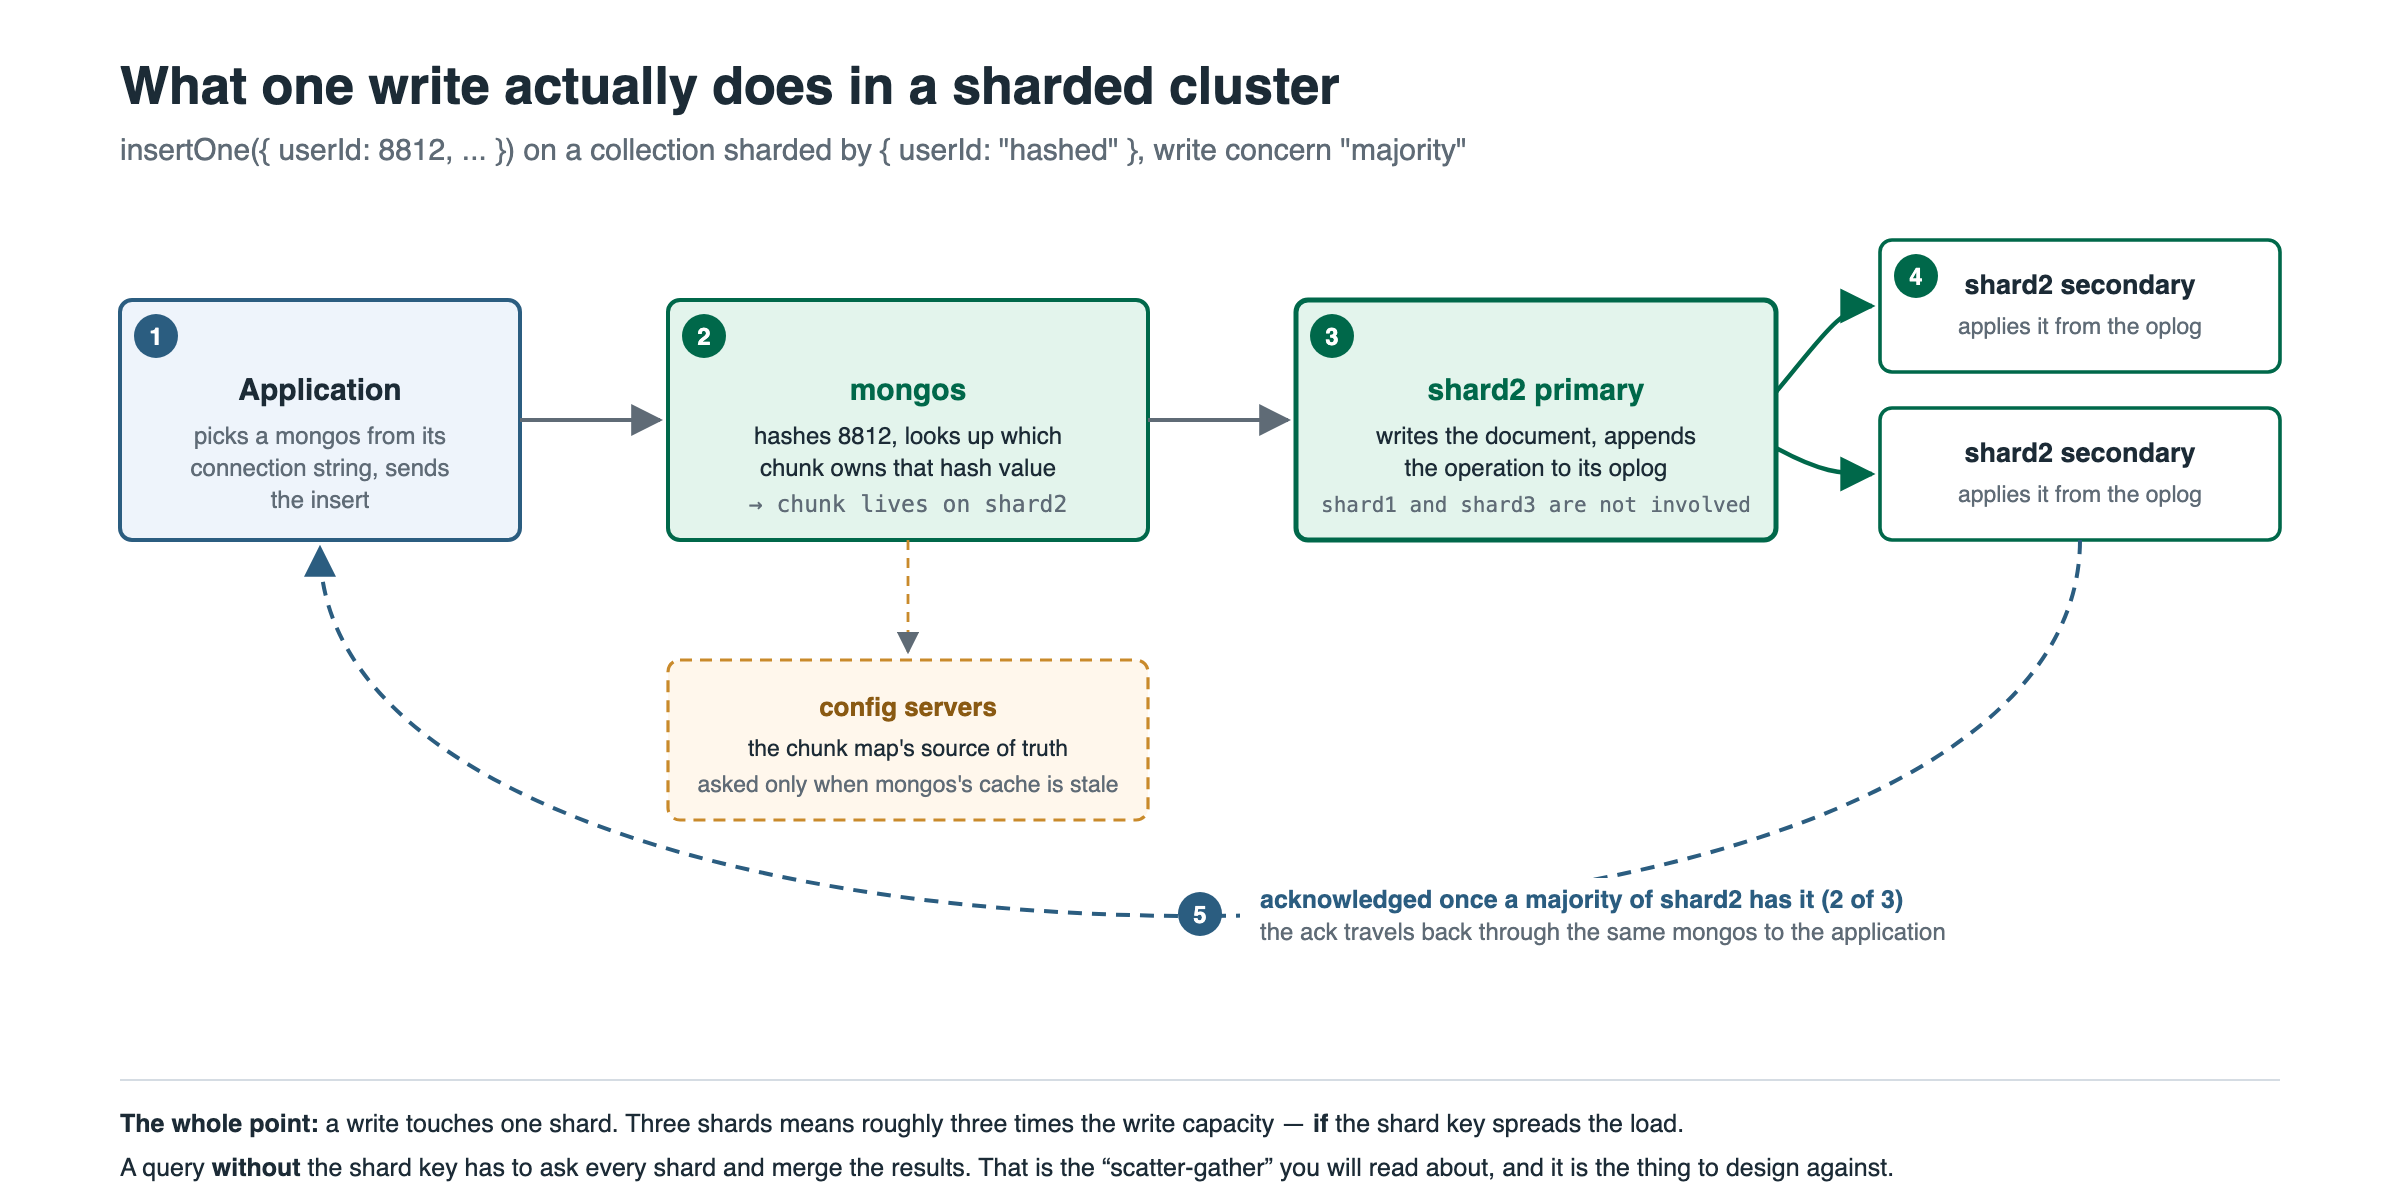
Everything above is plumbing. This is the design decision, and it is the one you cannot easily change — resharding exists in 7.0 and it works, but it is a heavy operation on a live cluster and not something you want to be doing because you guessed wrong.
The shard key decides which shard each document lives on. The router uses it to send a write to exactly one shard, which is the entire reason sharding scales writes. It also uses it to send a query to exactly one shard — if the query includes the key. A query without the shard key is sent to every shard and the results are merged; that is called scatter-gather, and a cluster whose common queries all scatter is slower than the replica set it replaced.
So the key you want has two properties. It appears in the queries you run most. And it spreads writes across shards rather than piling them onto one. Those two pull against each other, which is why this is hard.
- Hashed keys (
{ userId: "hashed" }) spread writes perfectly and make point lookups by that field fast. Range queries on the field become scatter-gather, because adjacent values hash to different shards. This is my default for anything keyed by an entity id. - Ranged keys (
{ region: 1, createdAt: 1 }) keep related documents together and make range queries cheap. The trap is a key that only increases — a timestamp, an ObjectId_id— because every new write lands on the same “last” chunk on the same shard, and you have paid for three shards to use one. - Low cardinality is the other trap. A key with twenty distinct values can never produce more than twenty chunks, and when a chunk grows past the limit and cannot be split because every document in it has the same key value, you have a jumbo chunk. The balancer will not move it. You will meet it eventually if you shard on something like
country.
Chunks default to 128 MB in 7.0 (older guides say 64 MB; that changed in 6.0). I have never needed to change it. If you do, it lives in the config.settings collection, and think hard first.
Part 3 — The details the documentation skips Link to heading
In rough order of how often they bite.
The keyfile permissions. chmod 400, owned by 999:999, identical bytes on every host. mongod checks and refuses to start otherwise, and the log line is easy to miss below the startup banner.
The compose command. docker compose up -d, from the directory holding docker-compose.yml. If you have a file with another name, it is docker compose -f other.yml up -d. I have seen (and, in an earlier post, written) mangled versions of this; the argument order matters.
Hostnames must resolve from the nodes. Not from your workstation. A replica set config full of hostnames that only your laptop’s /etc/hosts knows about will look healthy from mongosh and be completely broken.
The firewall, before the container. Allow 27017–27021 from the other cluster members and the application servers, by IP. Nothing else. Hetzner’s cloud firewall or ufw — either is fine — but the rule goes in before docker compose up, because the container is reachable from the internet the moment it starts otherwise.
Config servers are not optional metadata. If all three are down, the routers keep serving from their cached map, but nothing can split or migrate, and a router restart cannot come back up. Back them up (below) and keep them on three different physical machines.
Routers in the connection string, not behind a load balancer. List both routers in the URI, comma-separated, and let the driver do the failover. Putting a TCP load balancer in front of mongos works, but it hides which router a connection is on and makes every debugging session longer.
Memory limits and the OOM killer. Set the container memory limit above the WiredTiger cache size plus a comfortable margin — cache is not the process’s only memory. A limit set equal to the cache size produces a database that is killed under load and restarted by restart: always, over and over, and the symptom your users see is “it’s flaky”.
Clock drift. Replica set elections and oplog timestamps assume the nodes agree on the time. timedatectl set-ntp true on every host. A node with a drifting clock can get voted out of a set, and the log will not say so in those words — you will be staring at heartbeat timeouts on a machine that is otherwise fine.
Log rotation. logRotate: reopen in the config plus a logrotate rule on the host that sends SIGUSR1 to the container. Without it the log file grows until the disk is full, and a full disk is one of the few things that takes MongoDB down hard.
Part 4 — Running it Link to heading
A cluster that was set up once and never touched again is not a production database, it is a time bomb with a nice dashboard. These are the four things I actually do.
Backups you have restored Link to heading
For a replica set, take dumps from a secondary so the primary never feels it, and include the oplog so the dump is a consistent point in time rather than a smear across the minutes it took to run:
docker exec mongo mongodump \
  --host mongo2.example.com --port 27017 \
  --username root --password "$MONGO_PASSWORD" --authenticationDatabase admin \
  --readPreference secondary --oplog \
  --gzip --archive=/backup/rs0-$(date +%F).archive.gz
Then copy the archive off the host — object storage, another datacenter, anywhere that is not the machine you are backing up. A backup on the same disk as the database protects you from exactly nothing.
For a sharded cluster, mongodump through a router is not point-in-time consistent across shards: shard one’s dump and shard two’s dump are taken at slightly different moments, and the balancer may have moved a chunk between them. The honest approach is to stop the balancer, dump the config replica set and each shard’s replica set from a secondary, then start the balancer again:
sh.stopBalancer()      // wait until sh.isBalancerRunning() is false
// ... dump configReplSet and every shardNRepSet as above ...
sh.startBalancer()
I run this nightly, and once a month I restore it into a scratch replica set and count documents in the three collections that matter. That monthly restore is how you find out a backup job has been silently failing — and you want to find out that way, not during the restore you actually need. Restore is the test. Everything before it is hope.
Monitoring the five numbers Link to heading
I use mongodb_exporter into Prometheus and a Grafana board, but the tools matter less than watching the right things:
- Replication lag on every secondary. If it grows, something is wrong with a network or a disk, and a failover will lose those seconds of writes.
- Oplog window in hours (
rs.printReplicationInfo()). If it drops below the time it would take you to fix a dead node, a node outage becomes a full resync. - Connections per node against
maxIncomingConnections. Application connection leaks show up here first. - WiredTiger cache dirty percentage. Sustained above about 20 percent means writes are arriving faster than they can be flushed, and latency is about to climb.
- On a sharded cluster, chunk count per shard. They should be roughly equal. If one shard is pulling ahead, either the balancer is off or your shard key is skewing.
Alert on the first two before anything else. They are the ones that turn an incident into data loss.
Rolling upgrades Link to heading
The reason to have a replica set is that you can upgrade it without downtime. The order is always the same: secondaries first, one at a time, then step the primary down and upgrade it last.
# on each secondary, one at a time:
sed -i 's/mongo:7.0/mongo:8.0/' docker-compose.yml
docker compose up -d
# wait for rs.status() to show it SECONDARY and healthy before the next one
// on the primary, when only it is left on the old version:
rs.stepDown()
Then upgrade the ex-primary the same way. After every member is running the new version and you are satisfied — I wait a few days — raise the feature compatibility version so the new features actually turn on:
db.adminCommand({ setFeatureCompatibilityVersion: "8.0", confirm: true })
Do not raise it the same day. That setting is what lets you downgrade if the new version surprises you, and it only protects you while it is still set to the old value.
On a sharded cluster the order is stricter: stop the balancer, upgrade the config server replica set, then each shard replica set, then the routers, then raise the compatibility version through a router, then start the balancer. Routers last, because an old router talking to new shards is supported and the reverse is not.
Failover on purpose Link to heading
Once a quarter, I stop the primary container of one shard during a low-traffic window and watch. Election time, how long the application’s error rate stayed up, whether every dashboard I rely on noticed. It takes fifteen minutes, and it is the kind of exercise that catches an alert nobody re-routed after a Grafana upgrade, or a service whose connection string quietly lost retryWrites and throws on every failover. Neither is something you want to discover at 3 a.m.
A failover you have never seen is a failover you do not actually know works.
Where this leaves you Link to heading
A replica set that survives a dead server, the path to shard it when — and only when — you have to, and the habits that keep it alive. The two earlier posts stay up as a record of how I got here, but this is the one I would point you to now.
The setup described here has been in production, in one form or another, since late 2024. Most of what I would change is already in this text: the things I did not know then are the gotchas above, and the operations section exists because I learned each of those lessons the expensive way.
If you build this and hit something I have not covered, tell me. The gotchas list only grew because people wrote in.